File resolution: 300 dpi
Print size (marking): Our marking varies according to the bag size you choose, you can check it in our catalogue. In custom-made bags we can adapt to certain special needs and print to a maximum of 40x45cm.
File format
- If your design has only one colour:
- PDF format(.pdf)
- Adobe Photoshop (.psd)
- JPEG format (.jpg)
- TIFF format (.tiff)
- If your design has more than one colour:
- Adobe Illustrator (.ai)
- EPS format (.eps)
- Adobe Photoshop (.psd), with layers separated by colour
Important: If your design has some text, we must convert the typography to layout.
If you do not know how to adapt your design you can consult us and we will give you a hand
Colours: If you need your design to have a specific colour or colours, in our printing workshop we use the Pantone Solid Coated range as a colour code.
The colours do not overlap or get completely stuck together.
Screen printing only supports flat colours.
It can be single or double sided, with the same or different images
FOUR-COLOUR PRINTING:
4 calibrated colours are printed: cyan, magenta, yellow and black; which overlap each other to form a very wide spectrum of colours because they are not opaque. Full colour images can be reproduced on white backgrounds.
We take care of adapting your design to four-colour process.
DIGITAL PRINTING:
These are special printers that print thanks to inkjet on textile garments. It is an ideal technique for small quantities and full colour designs, and even for photographs, as it is not necessary to use either photolithography or screen.
We would need your file in jpeg,tiff or pdf at a minimum of 300 dpi.
IF YOU WANT TO KNOW MORE...
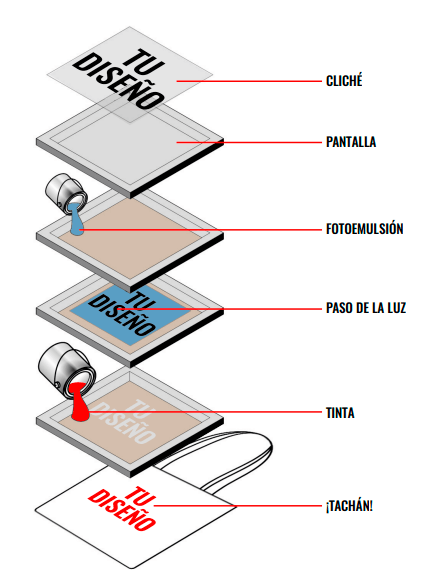
Serigraphy step by step
Create the photolithograph
Once you have sent us your design, we separate it by colour and from each one of them we print a photolithograph with opaque black ink on an acetate. In this way we will have the base to create the screens of each colour.
Our colleagues in the workshop have the necessary experience to create high quality photolithographs but it is also important that the design is suitable for this technique, that it is vectorised or has a high resolution to avoid unwanted problems and bad printing...
2. Create the screens
With the made photoliths we can already create the screens, which are manufactured in a handmade way with a wooden or metal frame and a mesh.
To create the screens we need to emulsify them. The mesh of the stencil is solidified when it is put into an ultraviolet light gun. The light sensitive emulsion will not harden in the black areas of the film and will allow the light to pass through. Where the film is transparent, the emulsion will harden and not allow the light to pass through, allowing the ink to pass through the areas of interest for printing the design.
Once this step has been carried out, we only have to clean the screen well and it will be ready for printing.
3. Stamping of the ink
All that is left is to stamp on the bag. We put the bag and the screen in the machines so that the design is printed in the same position. Once the ink has been applied, we wait for it to dry. We put it in a drying "tunnel", so that the ink is well impregnated in the bag and the design will hold without erasing for a long time.

- For screen printing to be profitable, production must have a minimum of 100 items
- Our standard bag printing size (3842LN) is 28x28 cm. The printing area can be adjusted to a larger size according to your needs. We can even make a bloody print, up to the edge, if we print the cloths before the bag is made.
- If your design cannot be adapted to screen printing, we recommend digital printing


